
Introduction
I think most designers assume that at some point they’ll land on a “perfect” workflow.
Something clean, structured, and consistent. A system that just works.
But over time, and across different projects, I’ve realised that creative workflows don’t really settle into something fixed. They shift depending on the work, the pace, and how many moving parts are involved.
So instead of trying to build a perfect system, I’ve focused on building something that’s flexible, clear, and easy to return to.
This is how I currently organise my creative work as a designer. Not perfect, but considered, and working well enough to rely on.
Quick Answer: How I Organise My Creative Work
I organise my creative work using a simple workflow built around five core parts:
- a clear project brief
- a curated space for inspiration and references
- breaking projects into smaller tasks
- a central workspace to track projects
- a consistent file organisation system
Together, these create enough structure to manage design projects without interrupting the creative process.
It’s not rigid. More like a base structure that adapts depending on the project.
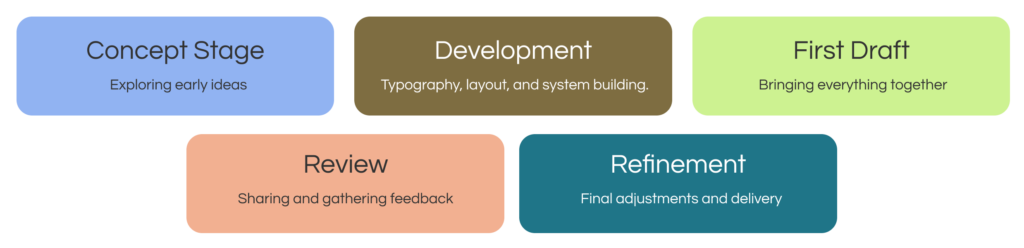
A Simple Creative Workflow (At a Glance)
To keep things clear, my workflow usually follows a structure like this:

Each stage builds on the previous one. It’s not strict, but it gives the work a sense of direction.
Starting With the Brief (Or Rebuilding It)
Most projects begin with a brief, although in reality, it’s not always presented as one.
More often, it starts as:
- a few messages
- a call
- scattered notes
- or a half written document
So one of the first things I do is rebuild the brief into something usable. For me, this usually lives inside Notion.
Not as a formal document, but as a page where everything related to the project can sit together.
That means pulling everything into one place so I can clearly see:
- what the project is trying to achieve
- what needs to be delivered
- any timelines or deadlines
- and what’s already been discussed
Once that’s clear, the design process becomes much easier to approach.
Without it, projects tend to drift, especially once feedback starts coming in.
If you’re looking at this more broadly, I’ve written about how designers organise their projects, which breaks this down into a wider system.
How I Collect Inspiration and References
This is probably the most flexible part of my workflow. Sometimes I start by sketching ideas first. Other times I go straight into collecting references.
At the moment, I tend to follow a simple process:

Most of this also sits within the same Notion project space.
Not because it has to, but because keeping references alongside the brief and notes makes everything feel more connected. One thing I’ve learned is that curation matters more than volume.
Too many references can make the direction feel unclear. A smaller, more intentional set usually makes decision making easier.
Breaking Projects Into Smaller Tasks
Once I have a direction, the next step is turning it into something I can actually start.
Large design projects can feel overwhelming when viewed as a whole. Breaking them into smaller steps makes them much easier to approach.
A typical structure might look like:
In Notion, this usually becomes a simple task list or board.
Nothing too structured, just enough to see what needs to happen next. It doesn’t need to be perfect. It just needs to make starting easier.
How I Track My Design Projects
For a while, I used an Excel spreadsheet to organise projects.
It worked well for naming and structure, but the workflow around it still felt fragmented. I was constantly switching between folders, spreadsheets, notes, and design tools.
More recently, I’ve moved to using Notion as a central workspace to organise the workflow around my projects. The files themselves still live in tools like Figma, Google Drive, or desktop folders. But Notion brings everything together.
Each project becomes a single place that holds:
Project Context
- brief
- notes
- goals
Creative Work
- links to design files
- references
Feedback
- comments
- revisions
Progress
- task lists or simple boards
- status updates
It’s less about replacing tools, and more about connecting them.
And in practice, that’s usually the part that makes the biggest difference.
If you’re interested in tools more broadly, I’ve also written about the tools designers use to stay organised and how they fit into different workflows.
How I Organise My Design Files
File organisation is one of those things that makes a noticeable difference when it’s done well.
And a very noticeable difference when it isn’t. Even with a central workspace like Notion, files still need to live somewhere structured.
I use a simple folder setup:

The biggest improvement has come from naming.
For example:
017_Acme_Website_2024
This makes files much easier to search and retrieve later, especially when managing multiple projects.
The number acts as a quick reference, which sounds small, but makes a big difference over time.
What’s Working (And What I’m Still Refining)
At the moment, what’s working well:
- having one place to see project context and progress
- breaking work into clear stages
- keeping briefs structured and easy to return to
What I’m still refining:
- when to collect inspiration, too early vs too late
- occasional file organisation slipping
- switching between tools more than I’d like
Most workflows aren’t perfect. They just need to reduce enough friction to keep things moving.
Final Thoughts
There isn’t a single “correct” way to organise creative work. Most designers develop their workflow gradually, refining it as projects evolve.
That’s definitely been the case for me.
At the moment, my workflow is a combination of simple systems that create just enough structure to support the work, without getting in the way of it. And that seems to be enough.
Leave a Reply